
Following up from my previous post on PIF Knowledge Sharing and Transfer, where I talked about leveraging Discourse within government, I thought I’d share my experiences setting up a Discourse server within AWS.
As a refresher, Discourse is an open source long-form chat or forum platform. In this particular use case, we leverage Discourse to support the White House Presidential Innovation Fellows program on knowledge sharing/transfer and collaboration across the federal government.
Although the recommended deployment method by the Discourse team is to use Digital Ocean (who is also their cloud service provider for their paid hosting services), this is not an option for us (read DO’s response here) as we are restricted to government approved cloud service providers via the FedRAMP program.
To get started, here is a list of Amazon Web Services we’ll be using:
- Virtual Private Cloud (VPC)
- Elastic Cloud Computing (EC2)
- Relational Database Services (RDS)
- Elasticache
- Simple Email Services (SES)
- CloudFront CDN
This is a comprehensive guide to setting up your own Discourse server via AWS, please feel free to leave any comments on updates or inaccuracies that you may find during your own setup.
Setting up your VPC and Security Group
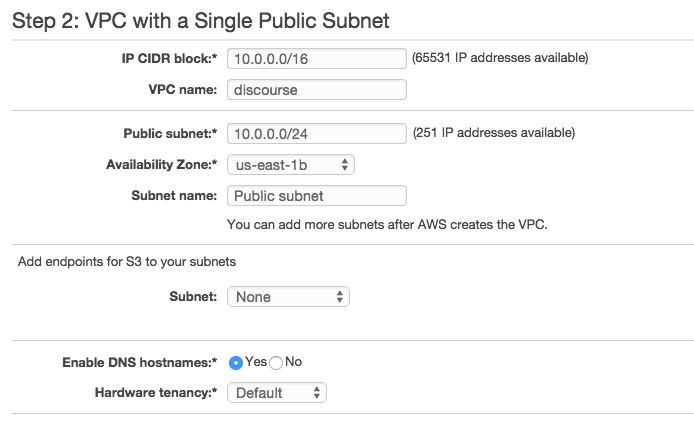
We’ll be creating our own VPC for this tutorial, but feel free to use an existing VPC if that makes the most sense based on your needs. Navigate to VPC, click on the Start VPC Wizard and select the VPC with a Single Public Subnet. You should then be presented with the following screen where you’ll need to designate a VPC name, specify an IP CIDR block (in thie case it was defaulted to 10.0.0.0/16) in the Public Subnet field and an Availability Zone.
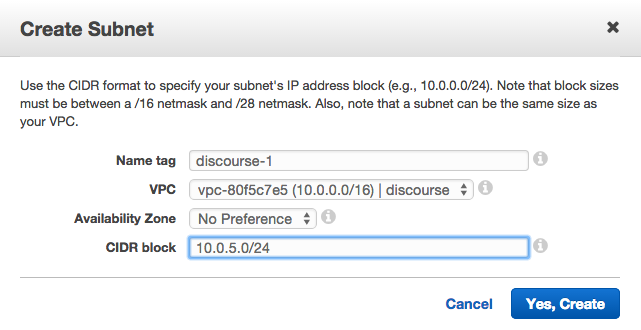
Next, click on Subnets and create at least TWO subnets for the VPC you just made. For me, there are four Availability Zones for the US East AWS servers (us-east-1[b-e]) so I created 4 subnets for each zone. You’ll need to set unique CIDR blocks for each of the Subnets.
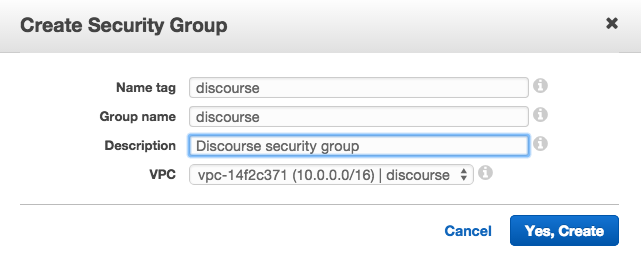
On the left hand side, under the Security section, click on Security Groups. You’ll see that a default security group has been created for you, which you can use, OR you can create your own, which is what we’ll do.
Click on Create Security Group and give the security group a Name tag, Group name and Description. Finally make sure to select the VPC you just created, which should be designated by ID and name.
Now, select your security group and click on the Inbound Rules tab in the details section. You’ll notice there are no Inbound Rules, which is something we’ll need to change. Click on Edit and add in the following rules:
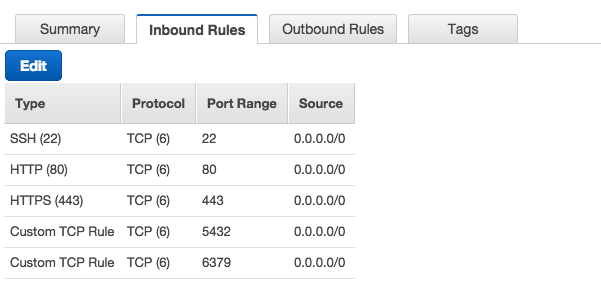
NOTE: Rules were created for SSH (from any IP using an AWS issued key_pair.pem, more on this later), HTTP (80) and TTPS (443) protocols, and Custom TCP Rules for the RDS PostgreSQL (5432) database and Elasticache Redis (6379) servers that will be created later on in this tutorial.
Creating a PostgreSQL database
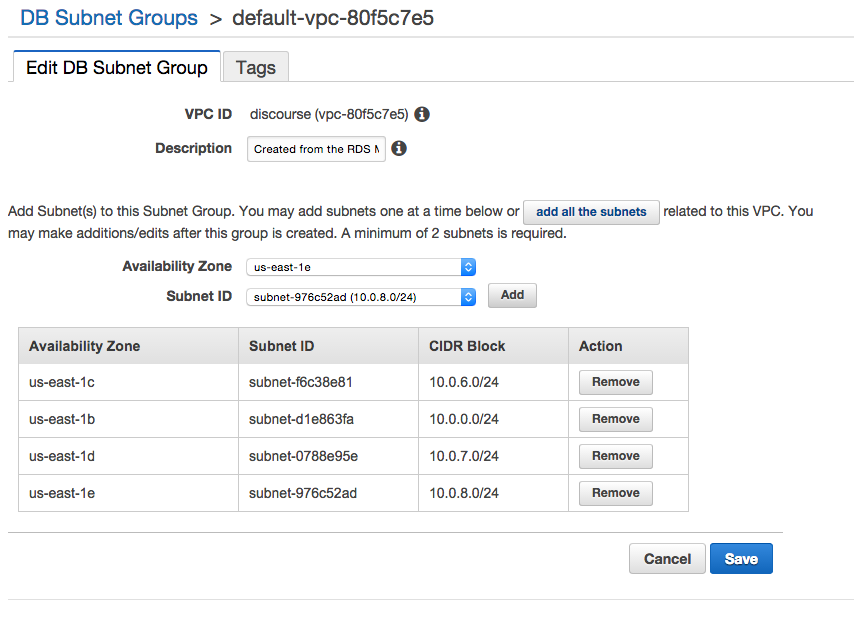
Within RDS, click on Subnet Groups on the left-hand navigation menu. Edit the VPC you just created (in this case ‘discourse’) and add all the subnets you created in the first step.
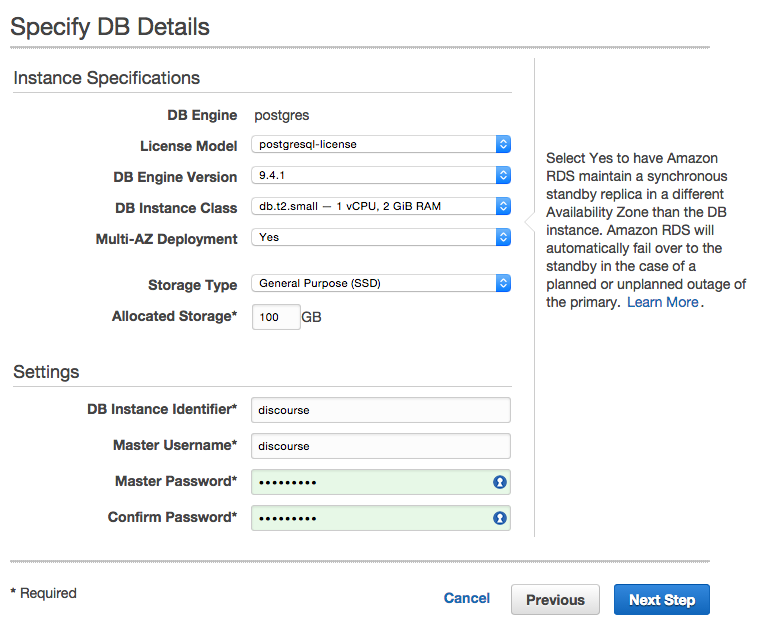
Head over to the RDS service and click on Launch a DB Instance, which will give you an option to select an engine. Select the PostgreSQL option and Yes, use Multi-AZ Deployment and Provisioned IOPS Storage as defaults while creating this instance.
Select an appropriate DB Instance Class, whether you want to use Multi-AZ Deployment and the Allocated Storage size (recommended at least 100GB). Finally, you’ll give the DB a DB Instance Identifier and Master Username/Password, which will be used to access your DB via the Discourse server.
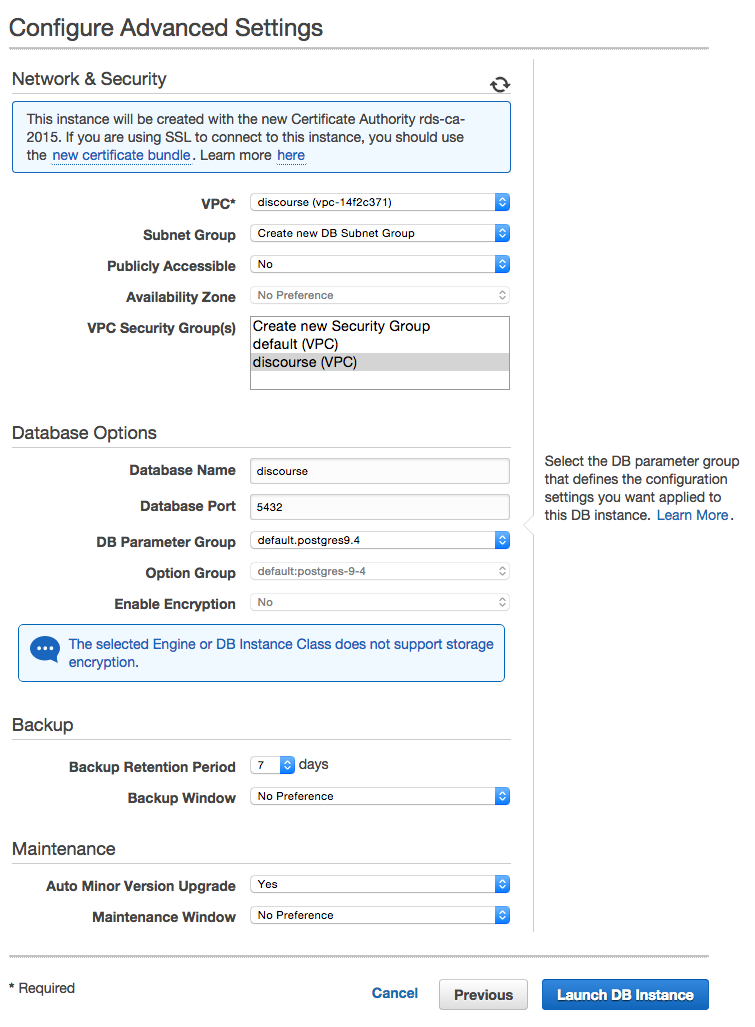
On the Configure Advanced Settings, you’ll need to setup your Network & Security for the DB, which is where that VPC you created comes in. Select the VPC you just created and the corresponding VPC Security Group. Finally, give your DB a name and then launch the DB instance.
Setting up a Redis server
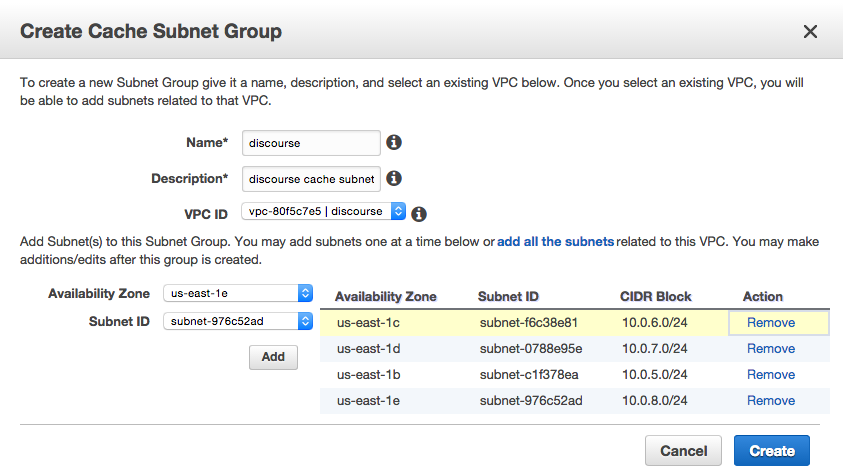
Navigate to Elasticache and click on the Cache Subnet Groups link on the left hand side navigation menu. Click on Create Cache Subnet Group and name your cache subnet group, give it a description, pick the VPC you’ve created and add the Subnet IDs by availability zone that you’ve created.
Next, click on the Launch Cache Cluster and select Redis as the engine type. On the following screen, give the Redis replication group a name, dsecription, select the correct node type (size) and the number of nodes you want to deploy for the cluster.
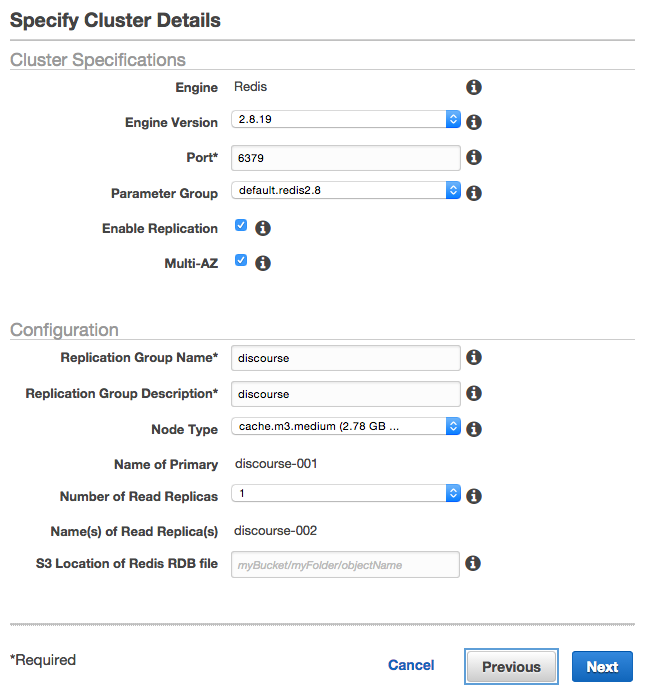
On the Configure Advanced Settings page pick the Cache Subnet Group and VPC Security Group you’ve created, then launch the Redis replication group.
Identifying SES SMTP credentials
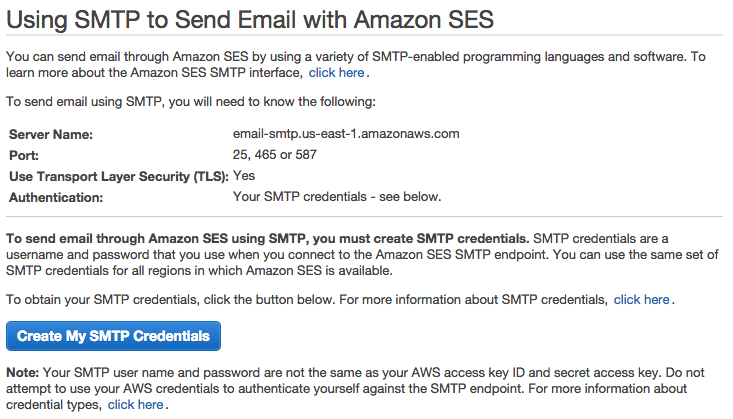
Go to the SES tool and click on the Email addresses and Verify a New Email Address to send an email confirmation to the email address you want use for email notifications. Next, click on the SMTP Settings link where you’ll find the SMTP info and create SMTP Credentials (user name and password, downloadable IAM), which both will be used to setup Discourse.
Launching your EC2 instance
To get started, navigate to the EC2 service and click on Launch Instance, which will take you to the Amazon Machine Image (AMI) list. Select the Ubuntu Server 14.04 LTS (HVM), SSD Volume Type (ami-d05e75b8)

The next screen you’ll be given an option to choose an Instance Type. Select the one that fits your needs (in my case, I chose t2.medium » 2 vCPUs and 4 GiB).
You’ll then be asked to configure your instance. Select the VPC and subnet you’ve created and enable the Auto-assign Public IP.
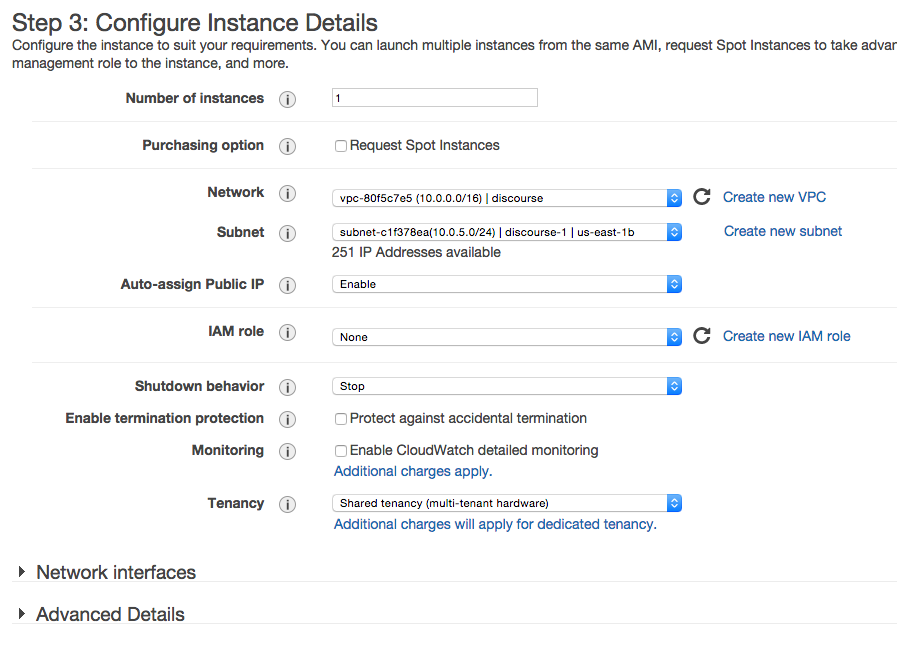
You’ll need to set the storage size, which is recommended to be at least 30GB. You’ll also need to Configure Security Group where you should select the existing security group you’ve already created. Select an existing or create a key pair (key_pair.pem) which will be used to connect to your instance. Finally, launch the instance and go back to the list of Instances within EC2.
Configuring Discourse
It’s time to SSH into your EC2 server to setup everything. Within the terminal, navigate to the location where the key-pair.pem (from the last step in the EC2 setup) and identify the Public DNS of the EC2 server, which can be found in the Description tab. Use the following command to ssh into the server
ssh -i key_pair.pem ubuntu@public_dns_address
From here on out you’ll be installing various things on your EC2 server, use the following commands and follow the prompts and let it run the installs.
sudo apt-get update && sudo apt-get upgrade
sudo apt-get install linux-image-generic-lts-raring linux-headers-generic-lts-raring
sudo reboot # requires ssh back into server
sudo apt-get install git
wget -qO- https://get.docker.io/ | sh
sudo usermod -aG docker ubuntu
sudo mkdir /var/docker
sudo git clone https://github.com/discourse/discourse_docker.git /var/docker
cd /var/docker
sudo cp samples/web_only.yml containers/app.yml
sudo cp samples/redis.yml containers/redis.yml
sudo cp samples/data.yml containers/data.yml
The final step is configuring the app.yml file
cd /var/docker/containers
sudo nano app.yml
From here you’ll be able to set all the configurations necessary. Use the Gist below as a reference for setting up the app.yml file:
https://gist.github.com/stroupaloop/7fa3cab406423da02d02
After you’ve saved those changes it’s time to launch Discourse
sudo ./launcher bootstrap app
sudo ./launcher start app
The bootstrap app command should respond with ‘Successfully bootstrapped…’ and the start app command should return a hash value. Once the app has been started you should be able to navigate to the Public IP address and access the Discourse server.
You should create an account using the email you listed in the DISCOURSE_DEVELOPER_EMAIL: line of the app.yml file. Email confirmation will be required so we’re going to ssh back into the server and confirm the first user.
cd /var/docker
sudo ./launcher enter app
rails c
user = User.find_by_email("<admin_email>")
user.admin = true
user.approved = true
user.save
EmailToken.confirm(user.email_tokens.first.token)
Finally, to attach the EC2 to your domain (or subdomain) go to your host records (in this case Route 53 within AWS) and create an A record that points to the EC2 public IP address.
Setting up HTTPS
So this is the #basic approach to setting up SSL within Discourse. I chose not to setup multiple redundant EC2 instances and an Elastic Load Balancer.
I first started off looking at THIS post on meta.discourse.org.
However, in the current configuration (Discourse/Docker) there was no folder named:
/var/discourse/shared/standalone/ssl
Instead, the path was
/var/discourse/shared/web-only
so you should create an ssl folder and place your ssl.key and ssl.crt (with these exact names) in that folder.
After you’re done, you can continue following the tutorial, which involves updating the app.yml file to include the nginx ssl template and for the docker container to listen to the HTTPS port (443).
Simply rebuild your app after that and you should be good to go.
cd /var/docker sudo ./launcher rebuild app
Setting up a CloudFront CDN to serve assets
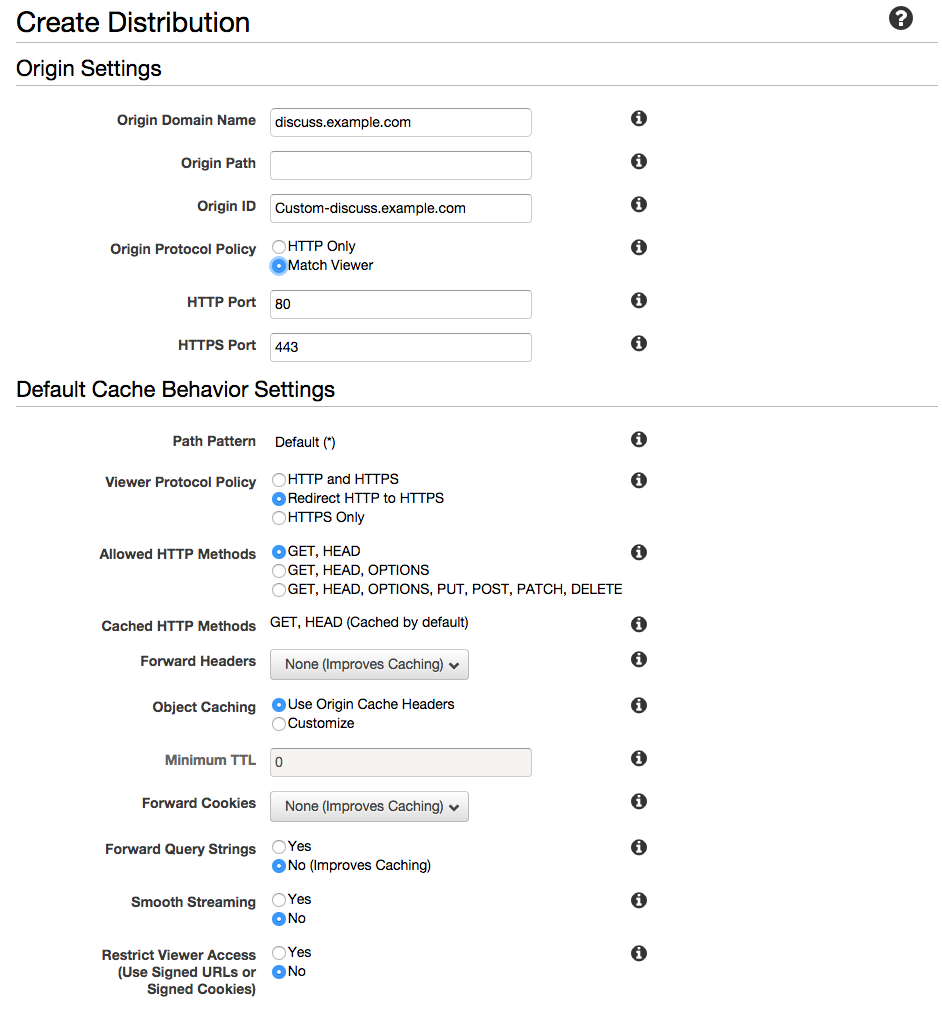
Go to AWS CloudFront and click on Create Distribution and choose the Web option. Enter in the domain (or sub-domain) of the Discourse forum in the Origin Domain Name field, select Match Viewer for Origin Protocol Policy and Redirect HTTP to HTTPS for the Viewer Protocol Policy.
Go back into the app.yml file and uncomment DISCOURSE_CDN_URL and add in the URL of your CloudFront distribution, keeping the ‘//’ before the URL.
Wrap Up
You should now have a fully functional Discourse server up and running. Drop me a note if you have any questions or think I’m missing a step somewhere, happy chatting!